Cinco de Mayo Feast

Cinco de Mayo is one of my favorite pseudo-holidays. Although it has historical significance in certain regions of Mexico, it has become a day to embrace Mexican culture here in America….but for me (and plenty of others, I’m sure), it’s just a great excuse to eat fresh Mexican food and imbibe in some refreshing Mexican spirits. Skip the crowded Mexican restaurant this year, and fix a feast at home. Here are some of my favorite recipes to help you along your way!

Taco Seasoning

  • 1 tsp. salt
  • 1 tsp. pepper
  • 1 tsp. cumin
  • 1 tsp. chipotle powder (or red pepper powder)
  • 1/2 tsp. onion powder
  • 1/2 tsp. garlic powder
  • 1/2 tsp. paprika

Combine all ingredients. Use to season ground beef, chicken, or steak.

Cilantro & Garlic Chicken

Tender chicken that falls to shreds with the touch of a fork. This can be used as filling for tacos, burritos, enchiladas, or quesadillas.

Shredded Chicken

For recipe, click HERE!

Mango Salsa

Super fresh and flavorful, use it as a chip dip or add a spoonful over your entree.

Mango Salsa

For recipe, click HERE!

Grilled Corn & Avocado Salsa

Super fresh and flavorful, use it as a chip dip or add a spoonful over your entree.

grilled corn & avocado salsa

For recipe, click HERE!

Jalapeno Poppers

A baked version of the appetizer favorite.

poppers

For recipe, click HERE!

Pork Taquitos

A great way to use up leftover pulled pork

Baked Pork Taquito

For  recipe, click HERE!

Mexican Rice

Mexican Rice

For  recipe, click HERE!

Guacamole

guacamole

  • 2 ripe avocados
  • Juice of 1 lime
  • 1 garlic clove, minced
  • 1/2 tsp. salt
  • 1/4 tap. pepper
  • Dash Tabasco sauce

Combine all ingredients, mash with a fork until desired consistency is reached.

For a zestier guacamole, add 2 tablespoons of salsa, 2 tablespoons of minced red onion, and a handful of chopped cilantro.

Margarita

Last, but certainly not least, the quintessential Mexican cocktail.

margarita

For the recipe, click HERE!

Corned Beef & Cabbage

Here in Savannah, St. Patrick’s Day is kind of a big deal. The city boasts the largest parade in the country, and people flood this town by the thousands. If you don’t mind a crowd, enjoy people watching, lot’s of bagpipes, and lax open container laws, then you should add Savannah St. Pat’s Parade to your bucket list. However, if you are daunted by overt drunkeness, lack of parking, and over priced hotel rooms….this may not be the scene for you!

Corned Beef & Cabbage

The handful of times I’ve cooked corned beef, I started with pre-brined meat – you know, the shrink wrapped cut of brisket that’s swimming in red slime and comes with a convenient flavor pack? Have you read the ingredients list on that packaging? If not, then don’t…it’s disgusting. This year I decided to step up my corned beef game by doing my own pickling brine. So on Friday morning I started looking at recipes, most of which want you to brine the meat for up to ten days. Ten days!? Damn, and I thought I was planning ahead…

Brined Brisket

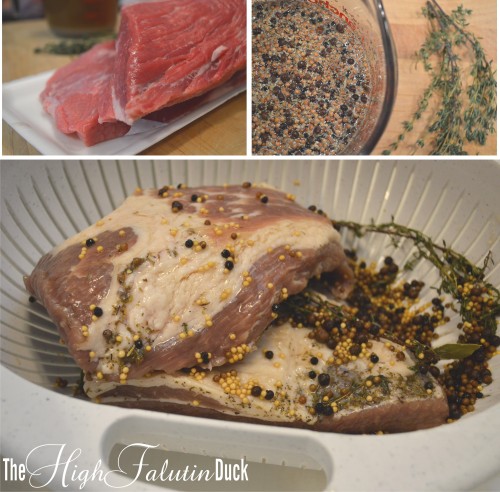
Tyler Florence to the rescue with a 5-star recipe whose brining instructions are “overnight or as long as 10 days.” Perfect.  I’ve got a few hours to spare now… My brisket choices were slim – I could choose between a 10 pound full cut of meat, or small 1.5 pound portions. I went with two of the smaller pieces and picked one flat end (leaner, tougher) and one point (fattier, more tender) for a total of 2 and 3/4 pounds of meat.

Get your brine and meat in a large ziplock bag, and forget about it in the fridge. The longer you can marinate the meat, the more pickled and flavorful it will be. Before you are ready to start cooking, drain and rinse the meat.

Braising Brisket

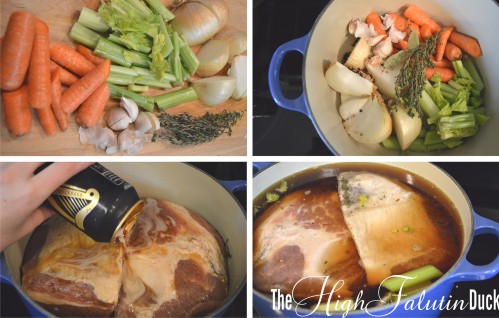
Since I’ve previously used the pre-brined brisket, I’ve always used the package cooking instructions (and the pitiful flavor pouch….). Typically the package wants you to do everything on the stove top – but Tyler says to put it in the oven. I’m going with the oven – just put the lid on, pop it in, and come back in 3 hours. No baby sitting to make sure the simmer is correct, and no temptation to peak at it (I get paranoid and feel the need to look every half hour…) I was a little disappointed that Tyler added only water to the braising liquid. Come on, it’s St. Patrick’s Day – a can of Guinness needs to be present in this meal (and no, I’m not counting the one I’m drinking…)

Corned Beef

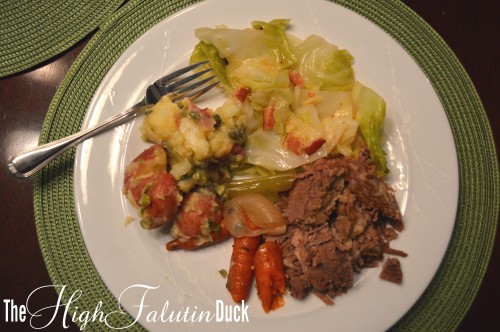
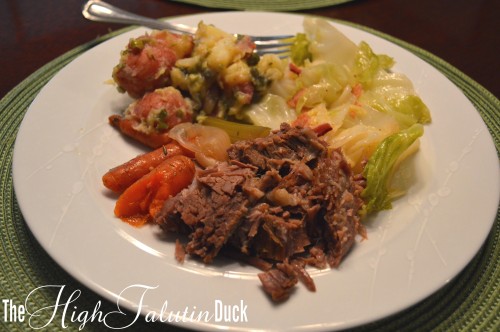
As for serving this beefy goodness, cabbage is a must. The original recipe wants you to cook the cabbage along with the meat – but I am not into mushy cabbage. So instead I went with a quick saute of bacon, garlic and a full head of green cabbage. And then I made French Potato Salad. Yep, I did. And I received multiple scowls of disapproval from my English Father-in-Law who requested boiled potatoes. I did boil them….then I slathered them in a vinegar-mustard-caper-green onion vinaigrette.  And then everybody forgot that I had bastardized this Irish dinner with a French side dish :)

Corned Beef Brisket Brine

  • Water
  • 1 cup kosher salt
  • 1 cup brown sugar
  • 1 1/2 tablespoons whole coriander
  • 1 1/2 tablespoons whole mustard seeds
  • 1 1/2 tablespoons whole black peppercorns
  • 1 1/2 tablespoons whole allspice
  • 4 sprigs fresh thyme leaves
  • 2 bay leaves
  • 1 (2 1/2 to 3 pound) brisket

Combine 1 cup water, salt and brown sugar. Whisk until sugar and salt have dissolved. Put water mixture and all remaining ingredients into a large ziplock bag. Add enough cold water to cover meat. Brine in the refrigerator overnight or up to 10 days (I did 2 and a half days).

Corned Beef Brisket

  • 3 tablespoons extra-virgin olive oil
  • 1 onion, halved
  • 4 carrots, chopped
  • 4 stalks celery, chopped
  • 1 head garlic, halved
  • 3 sprigs fresh thyme
  • 2 bay leaves
  • 2 tsp. whole peppercorns
  • 2 tsp. mustard seeds
  • 2 tsp. coriander seeds
  • 1 tsp. salt
  • 1 tsp. allspice
  • Brined brisket
  • 1 can Guinness (16 oz.)
  • water to cover

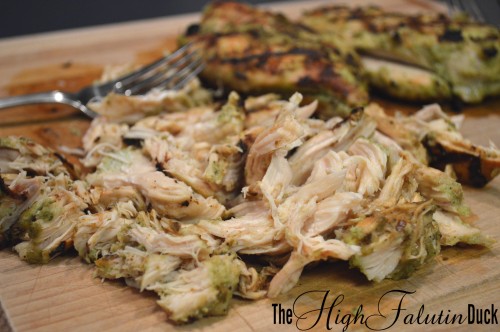
Heat oil in a large dutch oven or heavy bottomed pot. Add in vegetables and seasonings, saute until softened (about 10 minutes). Place meat over vegetables. Pour in Guinness and enough water to cover meat. Bring to a boil, cover, and reduce to a simmer. Simmer for 15 minutes. Then cook in a 300F preheated oven for 3 hours. Remove meat from cooking liquid and allow to rest for 20 minutes before serving. Slice meat against the grain.

Recipe adapted from Tyler Florence’s Corned Beef and Cabbage

Pork Taquitos

It’s the end of the week, and I need a dish to use up the rest of this pork butt. The ripe avocados on the kitchen sill are also screaming to be devoured. Not to mention it’s Thursday (the ultimate day to enjoy a margarita) – so something with a Mexican flare is definitely a must! Mexican Night is always a good way to use up leftover meat. Pot roast, grilled chicken, pork butt….all can be quickly and easily refabbed into an awesome weeknight meal.

Baked Pork Taquito

We tend to shy away from corn tortillas. Not because I don’t like them….but because the first time I made them for The Man, I made an awful dish. I had never bought soft corn tortillas before, and I pretty much just treated them like flour tortillas – big mistake. Soft corn tortillas have a nasty raw corn taste. They have to be cooked  fried for them to be palatable. Ever since that one snafu, The Man has vetoed the use of corn tortillas in his dinner plans. But today, I convinced him it was me – not them. We’ll see how round 2 goes!

Mexican Rice

Pork Taquitos

  • 2 C. cooked pork (substitute chicken or beef)
  • 6 Oz. beer (any lager, or light beer)
  • 1/2 C. water
  • 1/4 c. salsa
  • 1 tsp. cumin
  • 1 T. cilantro, chopped
  • salt and pepper to taste
  • 8 corn tortillas
  • 8 Oz. shredded cheese
  • Canola oil

In a saute pan, combine meat, beer, salsa, and cumin. Bring to a simmer, reduce to low, and cook until meat is in small shreds. Remove from heat and drain any excess liquid. Fold in cilantro

For assembly : Heat tortillas in the microwave until pliable (about 30 seconds). Working one tortilla at a time, place 1 ounce of cheese and 1/8 of meat onto bottom half of tortilla. Roll taquito tightly. Place seam side down in a greased baking dish. Repeat until all 8 taquitos are rolled. If tortillas start to break, reheat them.

Lightly brush each taquito with canola oil. Bake in a 400F oven for 25 – 30 minutes or until crispy and starting to brown.

Serve Taquitos with Mexican Rice, Guacamole, salsa and sour cream.

Mexican Rice

  • 1 C. white rice
  • 1 T. butter
  • 1/4 C. salsa
  • 1 C. chicken stock
  • 3/4 C. water
  • 1/2 lime
  • 1/4 tsp. salt
  • 1/4 tsp. pepper

In a medium pot, melt butter. Saute rice in butter over medium heat for 5 minutes. Add in all remaining ingredients. Bring to a boil. Stir, cover, reduce heat to low and cook for 15 minutes. Remove rice from heat and allow to sit for 10 minutes. Remove lid and fluff rice with a fork.

Guacamole

  • 2 ripe avocados
  • Juice of 1 lime
  • 1 garlic clove, minced
  • 1/2 tsp. salt
  • 1/4 tsp. Tabasco Sauce
  • 1/4 tsp. pepper

Slice avocados in half. Remove seed and scoop flesh out with a spoon. Add remaining ingredients, mash/mix avocado with a fork. Serve immediately.

Hey! Don’t forget to enter The Highfalutin Duck first ever GIVEAWAY! A $25 gift card to your favorite restaurant is at stake! So go enter!!

Easiest Chocolate Mousse Ever!

Alton Brown knows what he’s talking about. Take for example, his Chocolate Mousse recipe. Not only is it light, fluffy and awesome, but the recipe is super simple and easy to follow. And in case you didn’t realize, today is Valentine’s Day – so make some silky mousse for your sweetheart!

Easiest Chocolate Mousse Ever

Chocolate Mousse

  • 1 3/4 cups whipping cream
  • 12 ounces quality semi-sweet chocolate chips
  • 3 ounces espresso or strong coffee
  • 1 tablespoon dark rum
  • 4 tablespoons butter
  • 1 teaspoon flavorless, granulated gelatin

Chill 1 1/2 cups whipping cream in refrigerator. Chill metal mixing bowl and mixer beaters in freezer.

In top of a double boiler, combine chocolate chips, coffee, rum and butter. Melt over barely simmering water, stirring constantly. Remove from heat while a couple of chunks are still visible. Cool, stirring occasionally to just above body temperature.

Pour remaining 1/4 cup whipping cream into a metal measuring cup and sprinkle in the gelatin. Allow gelatin to “bloom” for 10 minutes. Then carefully heat by swirling the measuring cup over a low gas flame or candle. Do not boil or gelatin will be damaged. Stir mixture into the cooled chocolate and set aside.

In the chilled mixing bowl, beat cream to medium peaks. Stir 1/4 of the whipped cream into the chocolate mixture to lighten it. Fold in the remaining whipped cream in two doses. There may be streaks of whipped cream in the chocolate and that is fine. Do not over work the mousse.

Spoon into bowls or martini glasses and chill for at least 1 hour. Garnish with fruit and serve.

(If mousses are to be refrigerated overnight, chill for one hour and then cover each with plastic wrap)

Recipe courtesy of Alton Brown

Cherries Jubilee Champagne Cocktail

This week is all about Louisiana inspired desserts. We’ve already discussed the praline and Bananas Foster, and I think it’s time to lighten things up – not all desserts have to be fattening and full of sugar. Some of the best desserts are full of fruit….and liquor….and are of the drinkable variety!

Cherries Jubilee is a popular dessert at Antoine’s in New Orleans. Antoine’s is the oldest family-run restaurant in the country and has invented some classics like Oysters Rockefeller and Eggs Sardou. Similar to  Bananas Foster, Cherries Jubilee is doused in liquor, set on fire and served over ice cream. Let’s lose the flames and ice cream, and enjoy a sparkling cocktail instead!

Cherries Jubilee Champagne Cocktail

I found this recipe at Drink of the Week, and thought it sounded pretty good. Just a few notes – first, definitely take your time to muddle the cherries well. The contents of the shaker are poured (not strained) into the glass – so you don’t want chunky fruit messing up the texture of the drink. Second, choose a sparkling wine that is on the sweet side – stay away from Brut or Extra Dry. This will help counter the punch of the Bourbon and the bitters, and will compliment the sweet cherries. Third, use decent Bourbon. I had some cheap stuff on hand for the first go around, and I was contemplating nixing this cocktail altogether. Then I made a trip to the liquor store, and bought something off the middle shelf – and now this drink is a festive keeper!

Cherries Jubilee Champagne Cocktail (for 2)

2 Oz. frozen cherries
3 Oz. Bourbon
1/2 oz. lemon juice
Champagne/sparkling wine
Dash of bitters

With a wooden spoon, muddle cherries and Bourbon in a cocktail shaker. Add lemon juice and shake for 1 minute. Pour Bourbon/cherry mix into champagne flutes. Top with champagne and a dash of bitters.

Not only is this drink light and flavorful, it’s pretty too! It would make a perfect addition to any Valentine’s Day date!

Recipe courtesy of Drink of the Week.

Peanut Butter Oatmeal Pancakes

I’ve had a bottle of champagne hanging out in the fridge since New Year’s – and I’m tired of it taking up space. So I think breakfast for dinner (with Mimosas!) is in order. Yes, I just formed my dinner plan as an excuse to open a bottle of bubbly….but whatever….

peanut butter oatmeal pancakes

Everybody loves pancakes – right? Well everybody in this house loves pancakes! And breakfast-for-dinner nights are always a big hit. Tonight, I’m thinking pancakes, scrambled eggs and bacon! But not just plain old pancakes – Peanut Butter Oatmeal Pancakes! Made with buttermilk and served with warm raspberry jam….Mmmm…..

Peanut Butter Oatmeal Pancakes

  • 1/2 C. self-rising flour
  • 1/2 C. rolled oats
  • 1 T. sugar
  • 1 egg
  • 1/4 C. peanut butter
  • 1 C. buttermilk

Combine flour, oats, sugar and set aside. In a small bowl, microwave buttermilk and peanut butter until warm (about 45 seconds). Whisk peanut butter into buttermilk until smooth. Add buttermilk mixture and egg to flour mixture. Stir until just combined.

Heat up a skillet and spray it lightly with cooking spray. Pour out pancakes making sure they do not touch. When bubbles start to form and the edges look dry, flip the pancakes. Allow to cook for 2 – 3 minutes or until cooked through.

Scrambled Eggs

  • 5 eggs
  • 1/4 C. milk
  • pinch salt and pepper
  • 1 T. butter
  • 1/4 C. shredded cheese (if desired)

Warm up a non-stick pan on medium heat. Whip all ingredients until thoroughly combined, and lightened in color. Melt butter in preheated pan, and swirl to coat the pan. Pour in egg mixture. Allow them to cook for one minute before stirring. Stir gently, so as not to break up the curds too much. When the eggs are almost cooked through, remove them from the heat. Add in cheese, gently stir to combine.

Mimosa

  • 1 part Orange Juice, chilled
  • 2 parts Sparkling wine, chilled

In a champagne flute, pour in orange juice until 1/3 full. Slowly pour in champagne. Stop and allow bubbles to settle if needed.

When Life Hands You Limes, Make Margaritas!

Is it the weekend yet? Oh yes, it IS! It also happens to be 70F and sunny. I’m not sure about you, but I think a fresh cocktail is in order :)

Limes and Tequila

I still have  a few Meyer lemons (which happen to yield a TON of juice) and my grocery store had a good price on limes – so margaritas it is! If you are sitting there thinking “I hate margaritas”, give this recipe a chance. I have heard “I hate margaritas” and then spent all night squeezing limes and shaking cocktails for such naysayers. It seems the typical margarita experience involves bad tequila and high-fructose-corn-syrup (and green food coloring) laden mixes. That is NOT a margarita – that is just gross! A great margarita has simple, fresh ingredients – and good tequila!

When I say “good” tequila, do not confuse this with “expensive” tequila. You want something that tastes good. My favorite brand is Camarena – 100% blue agave, smooth taste, and it’ll run you about $25 for a liter. Not too bad, considering the prices of some top shelf brands! While you are at the liquor store, pick up some orange liqueur too – it goes great in a margarita.

Pick your citrus fruit – my norm is lime and orange. But since I have these Meyer lemons, today I’m using them instead of the orange. Grapefruit would be delicious too. I’ve also seen alot of watermelon margarita recipes on Pinterest….have at it – but this is not my cup of tea-quila.

The final addition is a sweetener. Just a touch, to really smooth out all the flavors. My choice is Agave nectar because it’s made from the same plant as tequila. The flavors compliment each other so well. I have had no trouble finding this in my local grocery store – they even carry multiple brands now! But in case you can’t find it, or you prefer not to go out and buy something you think you will only use once (trust me, once you have it you will use it. This stuff is good!) you can just use honey, or a little sugar.

Ok, now that we’ve covered the basics, it’s time to get out your cocktail shaker, glasses, and ice. Add your fresh juice, liquor, agave and a pinch of salt to an ice filled shaker. Shake until it’s so cold, you can barely stand it (about 2 minutes). Pour into glasses over fresh ice. Relax, and enjoy a great drink.

margarita

For 2 Drinks

  • 1/2 C. Tequila
  • 1/4 C. orange liqueur
  • 1/2 C. lime juice
  • 1/4 C. orange juice
  • 2 tsp. agave
  • pinch of salt

This is a 50/50 ratio of liquor to juice. Use the ingredients of your choice, and modify the ratio to your liking (although the 50/50 is pretty darn good!)

Beer Can Chicken

twins

Beer Can Chicken is great football-watching, sweat-pant lounging, lazy Sunday fare. The cooking method is slow, but it takes little to no messing with. After 2 hours of indirect heat on the grill, the bones fall out and the meat is melt in your mouth tender. It goes great with any side, and you can season to your liking. Nothing better to kick off the playoffs!

Two important factors to this dish are small chickens and cheap beer. Get 3 to 3 1/2 pound birds – anything bigger will dry out. They also won’t fit in my grill….and that is kind of important. As for the beer – don’t go buying some highfalutin craft beer (it will not increase the flavor of the chicken), and don’t spent much money. You want full flavor (not light beer) – we tend to go with Bud. You will be required to drink (or dump out, if that’s the way you feel about it…) 1/4 – 1/3 of the beer before you put the chicken on it. So make sure it’s a beer you don’t mind drinking.

Choose your dry rub. We like a little spice around here (that’s a joke – we like ALOT of spice around here) so I go with a house blend Cajun seasoning. Feel free to make your own blend, or use your favorite store-bought. You can’t go wrong here – lemon pepper, Cajun, Italian herbs, or just a simple salt and pepper – any and all will be great. The key to the seasoning is making sure you get plenty under the skin, as well as on top. Run your finger under the skin on the breast and thighs, and rub in a spoonfull of spice onto each piece. Then use another couple spoonfulls on the outside (including in the cavity). I like to do this in the morning, to give the flavor time to set in.

prepped

Next is the beer. Remove (use your chosen method) about 1/4 to 1/3 of the beer from the can. The beer will boil/steam  and fill your bird with moisture. If the can is too full, you may end up with boiling beer touching the meat – which isn’t good. Some people like to put some of their chosen spices, or aromatics (carrots, garlic, onion, etc) in the can. I don’t do this….but feel free to! Now to get the chicken on the can….spread it’s legs apart and just slide it on. Sounds kind of gross, putting a beer can up a chicken’s butt. But I promise, she won’t feel a thing. Once the bird is comfortable on the can, pull the leg bones around to the front. This will help stabilize the set-up (read : do this so your chicken and beer don’t fall over half-way through cooking).

seasoned

Every grill is different, and I can’t give you detailed instructions on how to use your grill. So use what you already know about your grill (temperatures, number of burners, hot spots, etc) and take what I have to say with a grain of salt. I start my Weber (with 2 burners) on high. After if has fully heated up (about 10 minutes), it is ready for the chicken. I turn the front burner completely off, and turn the back burner down to medium (or just under or over medium, depending on the temp outside). The chicken will go over the off burner (indirect heat). Put the breast side facing away from the heat source. Get her on, and close the lid. Open the lid just slightly and give it a peek – make sure the bird has clearance (isn’t touching the lid) and hasn’t fallen over. Now close the lid and walk away! Go watch the game, drink a beer, and hang out with your family.

grilling

The chicken will take 2 – 2 1/2 hours to cook. I like to give mine a peek after an hour, then every 20 minutes or so, until it’s done. You will know it’s done by checking the leg bone. Give it a wiggle – if you think “oh crap, it’s about to fall off!” then you are good to go! Use tongs (maybe 2 sets) to pull the bird (and beer) off, and place it upright on a cutting board. Wrap it loosely in aluminum foil and allow it to rest for 20-30 minutes before you cut it up. Be careful when handling the set-up – the beer can is HOT. And the beer inside is boiling and full of chicken drippings – so please refrain from drinking it (yes, I’m talking to you Dad!)

hot beer

For our sides tonight, we are having Jalapeno Cornbread and Broccoli Cheese & Rice Casserole. Other good accompaniments would be hashbrown casserole, baked potatoes, steamed broccoli, baked beans, or macaroni and cheese.

BC Chicken

Homemade Bailey’s

Perusing through Facebook one morning, I came across a friend’s picture of the Bailey’s cocktail he had enjoyed the night before. Yum! I thought, I love Bailey’s! In fact, my husband had recently spent $45+ on a bottle of that fattening deliciousness. Then I noticed the caption on the photo – HOMEMADE Bailey’s. Say whaaaaat!? I never imagined that this was something you could make at home, and for a fraction of the cost. I immediately got the recipe from his wife and gave it a whirl (literally – you will need a blender). No more store bought Bailey’s for us!

I modified the recipe slightly. The original called for heavy whipping cream, more almond extract, and less whiskey. The heavy cream is good – it produces a frothier drink. It is VERY good – but a little too filling for my cocktail tastes. I found the almond extract to be a little over powering – so it was reduced by half. And as for adding more liquor, well….

This goes great in coffee, or over a little ice. Or as my friend and his wife were having it – over coffee ice cubes! Enjoy.

bailey's_ingredients

  • 1 Cup half & half
  • 14 ounces (one can) sweetened condensed milk
  • 2 Tablespoons chocolate syrup
  • 3/4 teaspoon instant coffee grounds
  • 1 teaspoon vanilla
  • 1/2 teaspoon almond extract
  • 1 1/2 Cups Irish whiskey (I used Powers)

Chill whiskey and condensed milk. Add all ingredients in a blender. Turn on high for 1-2 minutes, or until well combined. Store in an air tight container (I use a mason jar). Keep refrigerated for up to a month. Makes 4 cups.

bailey'sA 750ml bottle of Irish whiskey makes 2 batches (8 cups total). It looks like I’m going to have to get another bottle…