Pickled Jalapenos

I’m not the most successful gardener. Over the years I’ve tried to grow a myriad of fruits and vegetables including, tomatoes, squash, eggplant, strawberries, watermelon, sweet onions, bell peppers, hot peppers, and herbs. Some with moderate success, and some (squash and zucchini) with disastrous results. However, I have consistently shined in the herbs and hot peppers department – producing an abundance of basil, rosemary, thyme, oregano and jalapeno peppers. In fact, my oregano is on it’s 5th year of continuous growth! And my peppers are in their second year :)

jalapeno plant

When I went to clear the weeds from my garden this Spring, my three naked and stickly jalapeno plants from last year appeared to have some life left to them. I clipped off the dead woody bits, and moved them to a pot with fresh soil (I nixed my large above ground garden this year in exchange for a smaller container garden on the porch). To my delight, the scrawny half dead plants came back to full life, and produced more peppers than they did the year before. In fact, it’s early August, and they are still producing jalapenos.

Having a successful crop isn’t exactly a problem, but I have run into the inevitable What am I supposed to do with all these jalapenos?? Poppers are always a good option, but the first dozen peppers or so were on the small side. So I let them sit in the fridge until I needed them…..which I didn’t….and didn’t….until Ok, I need to figure something out before they have to go in the trash!

Pickled jalapenos

This recipe for Pickled Jalapenos is mostly void of measurements. The amount of jalapenos varies, depending on the size of your peppers. And the water and vinegar is relative to the displacement of the other ingredients. But you only need to worry about 2 things. First, fill your jar almost to the top before adding liquid. Second, you want a 50/50 ratio of vinegar to water.

Pickled Jalapenos

  • Jalapeno peppers, sliced
  • 1 Lime, sliced
  • 1 Clove garlic, chopped
  • 1 Tbsp. agave nectar
  • 1 tsp. coarse sea salt
  • Apple cider vinegar
  • water
  • Mason jar

Add peppers, lime, garlic, agave and salt in a mason jar until almost full. Pour in vinegar until it comes halfway up the jar. Fill remaining jar with water. Put lid on tightly and shake to combine. Refrigerate overnight before use.

Now back to the original quandary – what to do with all these peppers?? Pickled jalapenos always make me think of nachos. So a heaping pile of grilled chicken nachos is where my first batch went :)

Mmmeatballs

There are two things that I always regret ordering at a restaurant – meatballs and fresh pasta. Not to brag, but I make a damn good meatball, and my fresh pasta is fantastic (ok, I totally just bragged…). So I can’t justify paying someone else to serve me a dry, flavorless meatball or gummy, wrongly cooked fresh pasta – I’m almost always disappointed. And it makes me want to go home and make my own!

Browning Meatballs

Unlike most meatball recipes, mine does not call for bread crumbs. I know the rational behind adding bread crumbs (or even bread) is to prevent the meatballs from drying out – but dry meatballs are not a problem that I encounter. I think it is because of my preferred cooking method – pan seared then braised in tomato sauce. The browning ensures a good texture, flavor, and stability (ie, your meat stays in a ball) and the slow braise keeps the meat tender and juicy.

Meatball Ingredients

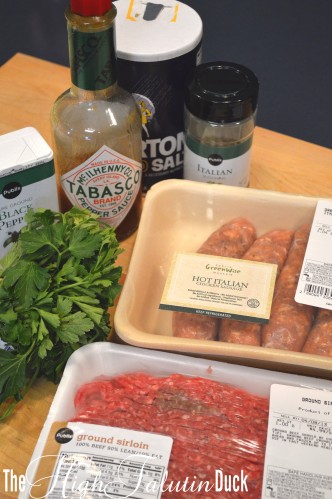
Let’s talk about meat! I like a 50/50 mix of lean ground beef and Italian sausage (I used hot chicken today, but sometimes use pork sausage). The fat ratio is good (not too fatty, but enough to hold your balls together and retain juiciness) and you are giving yourself a head start on the seasonings with the sausage. Ground veal is another popular option for meatballs, but it is not my preference. The price is too high, and the positive impact it makes on the meatball is too low to justify paying the price – or killing a baby cow for that matter. Now bring on a tender veal chop, and I’ll overlook the baby butchering…

Meatball Mix

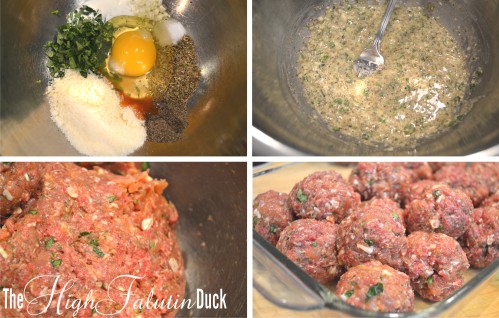
Take off your rings, trim your fingernails, and get ready to be wrist deep in meat – because the best way to mix your meatballs is by hand. Similar to making hamburgers, you want all of your flavors evenly distributed. You also don’t want to over work the meat. Hands are the perfect tool for ensuring both. I start by mixing my seasoning, cheese, cream and egg (do this with a fork or a whisk). Then add in the meat and get to work. Once you are happy with the meat mixture, start to form the balls.

You may be wondering does size really matter? No, not really (not with meatballs anyways…). I like about 1 inch round balls, but feel free to go big (or small, if that’s how you roll). Just keep in mind that with larger meatballs, they will need a longer time braising in the sauce. If you are planning on letting your sauce simmer all day (which isn’t a requirement, but it is a good idea!) then this isn’t a problem.

Browning Meatballs2

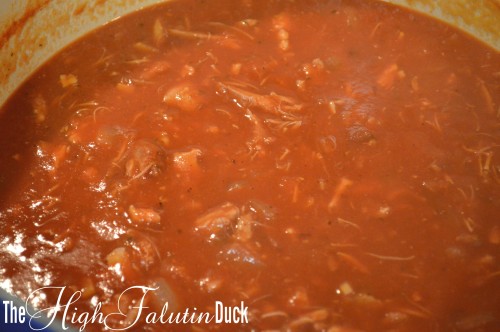
Before you start cooking the meatballs, make your sauce. After they are browned, you’ll want to transfer them into the simmering sauce. If you have a go-to tomato sauce recipe, then use it. If you need a new favorite, use mine (recipe below)! But God forbid, do not dump a jar of Ragu in a pot. These meatballs deserve the best, and the best is homemade.

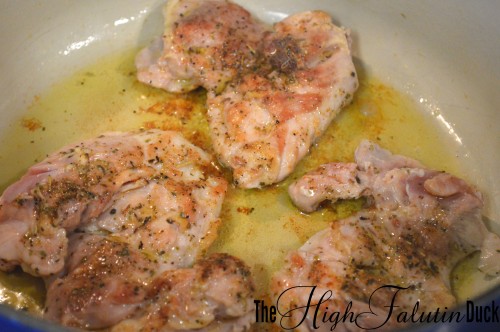
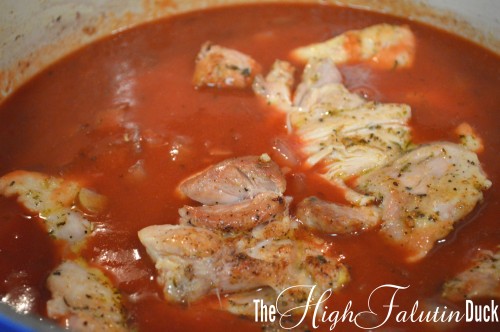
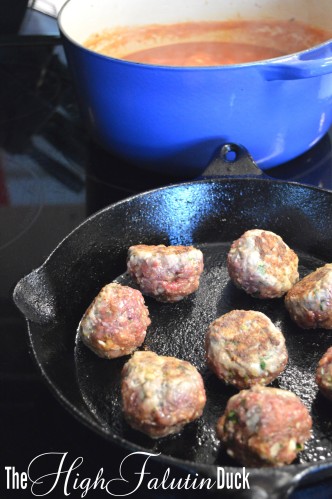
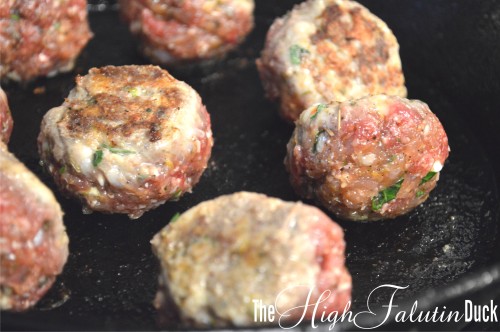
The ideal pan for browning the meatballs is a cast iron skillet. If you don’t have one, go buy one use a nonstick skillet. Heat the pan over medium heat and add about 2 teaspoons of olive oil. Take your time with the browning and don’t crowd the pan. It will take a few minutes per side to get a nice caramelized crust. If you go to check or turn your meatballs and they stick, wait a minute or two longer – once they are good and browned they will come right off. Move the browned meatballs over to the sauce, and give it a stir to make sure they are completely submerged.

Deglaze

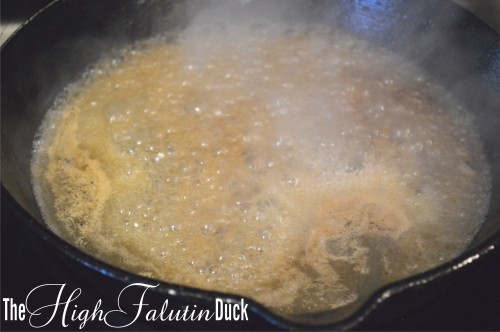
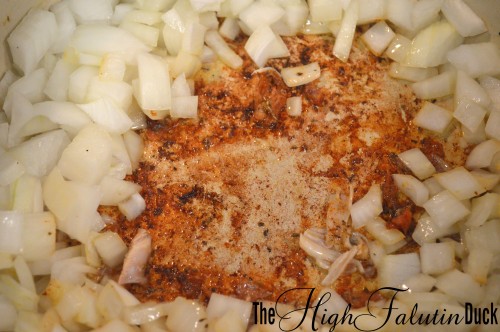
Once all of your meatballs are browned and transferred to the sauce, you may notice some little bits of seasoned meat stuck to your pan. We don’t want to lose those – that is some good flavor right there! Turn the heat off and pour a little chicken stock (or water. Or red wine….no judgment here) in the pan to deglaze. With your wooden spoon, scrape up all the stuck on bits. Now pour it into your sauce with the meatballs. Give it a good stir, and leave it to simmer for the next couple of hours.

Meatballs

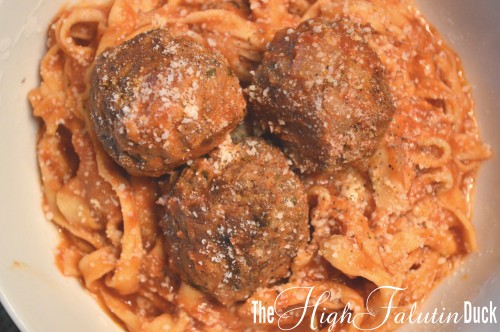
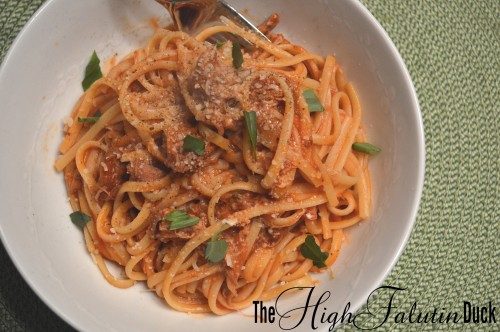
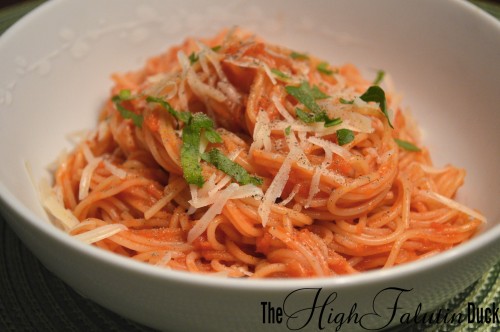
I like my meatballs served over a nest of fresh pasta and sprinkled with Parmesan cheese. Sorry, I don’t have a tutorial on making fresh pasta yet. I’ll need to grow a third arm or entrust The Man with the photography duties before I can feature a post about it. I’ll work on both…. But in the meantime, use the pasta that you prefer.

Meatballs

  • 1 Lb. lean ground beef
  • 1 Lb. Italian sausage (hot chicken)
  • 1 egg
  • 2 T. Parmesan cheese
  • 2 T. Italian parsley, minced
  • 1 T. garlic, minced
  • 1 T. Italian seasoning (dried herbs)
  • 2 tsp. black pepper
  • 1 tsp. salt
  • 1 tsp. cream (can use 2% or whole milk instead)
  • 1/2 tsp. Tabasco sauce
  • 2 tsp. olive oil
  • Tomato Sauce
  • 1/2 c. chicken stock

Whisk together egg, cheese, parsley, garlic, herbs, cream, pepper, salt and Tabasco. Add in meats and mix by hand until thoroughly incorporated. Form into balls (about 1″ round) and refrigerate until ready to cook.

In a cast iron skillet, heat oil over medium. Brown meatballs on all sides. Do not over crowd the pan, work in batches if necessary. Once browned, transfer meatballs to simmering tomato sauce. Stir to cover.

After all meatballs are browned and transferred to sauce, pour chicken stock into skillet. With a wooden spoon, scrape up any meat that is crusted onto the pan. Pour chicken stock into tomato sauce and stir through.

Allow meatballs to simmer in sauce, uncovered on low heat for at least 1 hour. For best results, simmer for 3 to 4 hours.

Tomato Sauce

  • 2 tsp. olive oil
  • 1 onion, diced
  • 3 cloves garlic, minced
  • 2 T. thyme, minced
  • 1/2 to 1 tsp. red pepper flakes
  • 1 box Pomi strained tomatoes (or 28 oz. can pureed tomatoes)
  • 1/2 C. water
  • 2 T. brown sugar
  • salt and pepper to taste

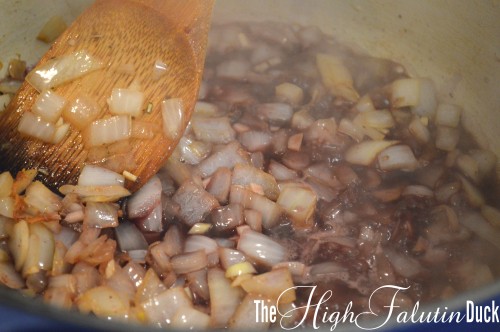
In a dutch oven or stock pot, heat olive oil over medium-high heat. Add in onion and saute until translucent. Add in garlic, thyme and red pepper flakes. continue to cook until onions are lightly browned. Pour in tomatoes and water. Stir in brown sugar, salt and pepper. Bring to a boil then reduce to a simmer.

Lemon & Honey Grilled Chicken

After a trip to the Savannah Bee Company, I’ve been mildly addicted to their Sourwood Honey. The local store is a favorite of ours. Beyond the great honey and products, they have a live hive inside (no, the bees don’t fly around the store…but you can watch them work through the clear walls!) and a children’s “hive” for coloring and reading. While shopping one day, I indulged in no less than 8 samples before deciding I really ought to buy some of the liquid gold.

sourwood honey

Even if you don’t have a jar of sourwood, you should try using some good honey the next time you fire up the grill. Lemon & Honey Grilled Chicken combines the tang of lemon (which tenderizes the meat during the marinating time) with the sweetness of honey to create a flavorful departure from your standard grilled BBQ chicken.

Lemon & Honey Chicken

Marinade

  • Chicken (thighs, trimmed)
  • Zest and juice of 1 lemon
  • 1/4 C. red wine vinegar
  • 2 T. olive oil
  • 6 sprigs fresh thyme
  • 2 cloves garlic
  • 1 T. dried Italian herb blend
  • 1/4 tsp. salt
  • 1/4 tsp. pepper

Combine all ingredients except chicken in a food processor or blender. Pulse until well chopped and blended. Pour marinade over chicken, and refrigerate for a few hours (I did 4).

Lemon & Honey Glaze

  • 1/4 C. lemon juice
  • 1 T. honey (sourwood)
  • 1 T. butter, melter
  • 1/8 tsp. salt
  • 1/4 tsp. pepper

Whisk all ingredients together. Brush onto chicken in at the end of the cooking time.

Grilled Shrimp Scampi

Shrimp Scampi always seems like a good idea – until you look at recipes that call for mountains of butter or oil. I’m not afraid of butter – but my ass and thighs can be a little vindictive. I recently came across a scampi recipe that replaced all of the fat with chicken stock. Good idea! I thought, but the rest of the recipe had little to offer. So I incorporated the use of chicken stock with a better Scampi recipe, and came out with a pretty good (lower fat) Shrimp Scampi.

Grilled Shrimp Scampi

I marinated and grilled my shrimp. If you don’t feel like grilling (or the weather isn’t so good) you can saute the shrimp in the pan before you start your sauce. Drain the shrimp from the marinade, and quickly cook them in your pot. Set them aside when they are slightly under cooked, they will cook through while they rest on the plate (this goes for grilling the shrimp too).  The sauce goes together quickly, so don’t worry about your shrimp getting cold.

Grilled Shrimp Scampi

  • 1 Lb. pasta (linguine)
  • 1 T. butter
  • 1. T. olive oil
  • 4 -6 garlic cloves, minced
  • 1/2 C. white wine (Chardonnay)
  • 1 C. chicken stock
  • Juice of 1 lemon
  • Salt and pepper to taste
  • Grilled shrimp
  • Garlic bread crumbs

Cook pasta in salted water until al dente. Drain and set aside. In a large pot, heat butter and oil over medium heat. Add in garlic, and cook for 2 to 3 minutes. Pour in the wine, and allow to simmer for 2 minutes. Add in stock, lemon juice, salt and pepper; simmer for 5 minutes. Add reserved pasta and handful of parsley to sauce. Reduce heat to low, and cook pasta for about 5 minutes or until pasta is cooked through and soaked up most of the sauce.

To serve, plate pasta into a shallow bowl. Top with 6 or 7 shrimp and 1 to 2 Tablespoons of bread crumbs.

Grilled Garlic & Lemon Shrimp

  • 1 Lb. shrimp, peeled and deveined
  • Juice of 1 lemon
  • 1 clove garlic, minced
  • 3 T. olive oil
  • 1/4 tsp. salt
  • 1/4 tsp. pepper
  • wooden skewers

Combine lemon juice, garlic, salt and pepper. Slowly whisk in olive oil. Add shrimp and marinate for 30 minutes. Put shrimp onto skewers (5 or 6 per stick). Grill over medium heat for 3 minutes per side, or until almost cooked through. Remove from heat and allow to rest while you prepare the sauce. Remove from skewers to serve.

Garlic Bread Crumbs

  • 4 – 6 slices bread
  • 1 small garlic clove, roughly chopped
  • 2 T. olive oil

In a food processor, pulse bread and garlic until finely ground. Heat oil in a nonstick skillet over medium-high heat. Add in garlic bread crumbs and cook until golden, stirring frequently.

Beef Broth Soup With Caramelized Onion Grilled Cheese

Beef Broth Soup

My Sweet Pea started 3 year old pre-K two weeks ago – and she’s now been battling a cold for about two weeks. I’m assuming the few days that she actually attended school, they really focused on learning how to share – because Little Miss shared her sickly germs with me (such a good sharer – I’m a proud Mama!). So after 2 weeks of little appetite, lot’s of coughing, a little fever, and 2 boxes of tissues – I am totally sick of it. I’ve finally got my appetite back, and all I can think about is a crisp gooey grilled cheese and a piping hot bowl a soup. So soup and sammie it is!

Caramelized Onion Grilled Cheese

Beef Broth Soup

Stock

  • 1 1/2 Lbs. beef short ribs
  • 1/2 Lb. chuck steak
  • 1/4 C. red wine (merlot)
  • 2 carrots, rough chopped
  • 2 stalks celery, rough chopped
  • 1 onion, quartered
  • 3 cloves garlic, smashed
  • 2 tsp. salt
  • 1 T. peppercorns
  • 6 fresh thyme sprigs
  • Water to cover (8-10 C.)

Soup

  • 4 crimini mushrooms
  • 2 green onions
  • 1 garlic clove
  • 1 tsp. chopped thyme
  • salt and pepper, to taste

For stock : In a large stock pot, brown short ribs in 1 T. olive oil. Add in wine, simmer for 3 to 4 minutes. Add in chuck steak, vegetables and garlic. Pour in enough water to cover by an inch or so. Season with salt, peppercorns and thyme. Bring to a simmer and reduce heat to low. Cover and allow to slowly simmer for 3 – 4 hours.

Remove ribs and pull meat off of the bones. Shred meat and set aside for later. Remove large vegetable pieces and discard. Strain broth through a sieve lined with cheesecloth into a large bowl. Cover bowl and allow to cool. Once broth has cooled, skim fat from broth.

For soup : In a pot, bring broth and meat up to a simmer. Slice mushrooms, green onions, and garlic paper thin. Add to broth. If needed, add salt and pepper. Simmer uncovered for 20 – 30 minutes. Serve hot with grilled cheese sandwich.

Caramelized Onion Grilled Cheese Sandwich 

  • 8 slices bread (5-grain Italian)
  • 4 – 6 Oz. cheese, shredded (mozzarella and sharp cheddar)
  • Caramelized onions (2 large onions)
  • 1 T. butter, softened

Heat a non-stick skillet over medium head. Lightly coat each slice of bread with butter, place for slices (butter down) into the skillet. Top each piece of bread with 1/4 of onions and 1/4 of cheese. Top with second slice of bread (butter up). Grill until bottom bread is golden. Flip sandwiches and cook until second side is golden and cheese has melted through.

Chicken Ragu

After a quick sear and a long simmer, the chicken in this ragu will melt in your mouth. A little wine adds flavor to the sauce (a glass for the chef doesn’t hurt either!) and the fact that this dish is economical is the icing on the cake (or the cheese on your spaghetti…)

Chicken Ragu

I like to use boneless skinless chicken thighs for this dish. They are butterflied open (making them thin and quicker cooking) and the dark meat is so tender and flavorful. Not to mention that thighs are much cheaper than breasts. Lightly season the meat and pan sear both sides. You aren’t trying to cook the chicken through, you just want a little brown on them. The meat will finish cooking (and fall to shreds) in the sauce.

Browning Chicken

Once you’ve got the meat browned (you may need to cook the pieces in batches) it’s time for the onions. Don’t worry about any chicken or brown bits that have stuck to the bottom of the pan – put the onions right on top. Moisture from the onions will help pull some of it up (and a douse of red wine will finish the rest!) Cook the onions for about 10 minutes, or until softened.
Saute OnionsTime to reach for the wine (the bottle, not your glass…) and pour in about 1/4 cup to deglaze the pan. Use your spoon to scrape up all the stuck on bits, and then bring the wine up to a simmer. It’s best to let it cook for a few minutes before adding anything else – this will allow the alcohol to cook out and the wine flavor to concentrate. Now you may be wondering what kind of  “red” wine to use. Personally, I’m not real picky about wine…in fact, we tend to go with cheap or on sale (or my favorite of all cheap and on sale). Avoid a sweet red, or anything labeled “table wine”. But anything you already have on hand (or wouldn’t mind drinking) will work great.

Deglaze with wine

Now everybody in the pot – tomatoes, chicken stock (boxed stock is perfectly fine here), brown sugar, seasonings and chicken. Stir it up (make sure the chicken is covered) and bring it up to a simmer. Put a lid on the sauce and reduce the heat to low. You want the pot to be slowly simmering – not boiling. One to two bubbles surfacing for second is ideal. After the first hour, you’ll want to remove the lid to allow some of the moisture to evaporate.

Chicken back in the pot

For the best results, the chicken needs to simmer for about 3 hours. I know, this is a long time – the long slow cooking helps keep the chicken tender and juicy, while turning it into bite sized shreds. But if you don’t happen to have 3 hours before dinner time, there are a few shortcuts that work great as well. Option 1 – dice up your meat. Obviously smaller pieces cook faster. I would season, sear, them cut into 1 inch pieces. Option 2 – use chicken that’s already cooked. But depending on how the chicken was previously cooked, will yield different results. Leftovers from a Beer Can Chicken, a store bought rotisserie chicken, or meat left from making stock would be best.

Long simmer

Every so often (half hour or so) you will want to give your pot a stir. Your chicken may need a little encouragement – use your spoon to gently break it apart. If you are worried the pieces aren’t shredding in a timely manner, feel free to pull it out and shred with two forks.

Once your chicken has successfully broken down, and your taste buds are drooling, it’s time for the pasta (yay, finally!). I like linguine for this sauce. The flat noodles are more substantial than say an angel hair, and the texture goes well with the sauce. Boil it up, drain it, then add it to the sauce. Let it cook for a few more minutes, to allow the sauce and pasta to become one. To serve, add a little torn basil, parmesan cheese, and fresh black pepper.

Chicken Ragu

Chicken Ragu

  • 1 1/2 Lbs. Boneless skinless chicken thighs
  • 1 T. Cajun seasoning
  • 1 T. Italian seasoning
  • 1 T. Olive oil
  • 1 medium onion, diced
  • 3 cloves garlic, minced
  • 1/4 C. Red wine
  • 1 C. Chicken stock
  • 1 box Pomi strained tomatoes (or large can of pureed tomatoes)
  • 1 T. Brown sugar
  • 2 tsp. Salt
  • 1 tsp. Black pepper
  • 1 lb. Linguine

Combine cajun and Italian seasonings and lightly coat both sides of chicken. In a dutch oven, brown chicken in olive oil (do not worry about cooking through). Remove chicken from pan.

In same pot, saute onions until soft. Add in garlic and cook for 2 minutes. Deglaze the pot with the wine. Use a wooden spoon to scrape the bottom of the pot. Allow wine to simmer for 2 to 3 minutes. Add in stock, tomatoes, brown sugar, salt, pepper and chicken. Bring to a simmer, cover, and reduce to low.

After 1 hour, remove lid. With a wooden spoon, gently break apart chicken. Simmer for 3 hours. Stir and break up chicken every half hour.

Cook pasta according to package directions. Drain and add to sauce. Allow to cook in sauce for 5 minutes before serving.

Greek Pasta Salad


And for the pasta portion of tonight’s Gyro Burger dinner – Greek Pasta Salad. Colorful and flavorful, this is a zingy dish that goes great as a side. Or have it for a quick filling lunch!
Greek Pasta Salad

Greek Pasta Salad

  • 12 Oz. tri-color rotini pasta
  • 1/2 pint grape tomatoes, halved
  • 1/4 C. red onion, diced
  • 1/2 cucumber; peeled, seeded and diced
  • 1/4 C. Spanish olives, sliced
  • 1 T. capers
  • 2 T. feta cheese, diced or crumbled
  • Greek dressing

Cook pasta according to package directions, drain and set aside. Combine all other ingredients except for cheese and dressing. Toss to combine. Then add in pasta and dressing. Thoroughly coat pasta and vegetables. Allow to cool for 15 to 20 minutes before adding in feta cheese. Cover and refrigerate until ready to serve.

Greek Dressing

  • 1 T. fresh oregano
  • 1 T. Italian parsley
  • 1 T. lemon zest
  • 1 T. lemon juice
  • 1 T. honey
  • 1 small garlic clove
  • salt and pepper to taste
  • 1/4 C. red wine vinegar
  • 1/4 C. olive oil

Combine all ingredients in a blender. Blend until smooth.

Greek Pasta Salad

Spaghetti with Marinara

Pasta Marinara

Nothing highfalutin about making your own pasta sauce – yet most people still want to grab for the jar on spaghetti night. If you are accustomed to getting your pasta sauce pre-made from a jar, you will be pleasantly surprised at how quick and simple making fresh sauce is. And once you taste your own homemade sauce, you might never buy jarred again!

Marinara on the Fork

Spaghetti with Marinara

  • 1 Lb. long pasta (spaghetti, angel hair, etc.)
  • Marinara sauce
  • Freshly grated parmesan cheese
  • Cracked black pepper
  • minced parsley (optional)

Cook the pasta according to package directions. Drain and return to pot. Place the pot over medium-low heat. Ladle in sauce about 1/2 a cup at a time until pasta is lightly coated. Do not over sauce the pasta. Stir regularly and allow pasta to cook into sauce for about 5 minutes. Add more sauce if needed.

To serve, place a serving of pasta onto serving bowl. Sprinkle with cheese and parsley, season with pepper.

Marinara Sauce

  • 2 T. olive oil
  • 1/2 C. onion, diced
  • 2 carrots, shredded
  • 2 garlic cloves, minced
  • 2 sprigs fresh oregano
  • 2 sprigs fresh thyme
  • 1 bay leaf
  • 1 box Pomi strained tomatoes (25 oz.) (similar to canned tomato sauce)
  • salt and pepper to taste

Over medium-high heat, warm up the olive oil. Saute onions and carrots until both are softened and cooked through. Add in garlic and herbs. Cook for 2 minutes. Add in tomatoes, 1/2 cup of water, salt and pepper. Bring to a slow boil then reduce heat to low. Allow to simmer, uncovered, for at least half an hour. Sauce can be simmered for much longer to develop flavors, but it will need to be covered for anytime after the first 30 minutes. Remove herb stems before using.

Cilantro & Garlic Tacos with Mango Salsa

When I met The Man, he claimed to not like Mexican food. But I love Mexican food! Ok, I thought, this is a small concession that I can live with. But a life without Mexican food means no fresh salsas, no garlic and cilantro marinated meats, no cheesy saucy baked tortilla dishes….no Margarita Thursdays!? Ok, this was a bigger problem than I first thought!

Chicken Taco

His former experience with Mexican cuisine involved greasy, bland concoctions that contained suspect meat products and void of all vegetables. Yea, I would hate that too. When I think Mexican, I think fresh, full of complex flavors, and tons of color. Well it turns out that he doesn’t hate Mexican food – he just hates bad Mexican food! Phew! We dodged a bullet there…

Garlic & Cilantro Garlic & Cilantro Marinade

Let’s start with the meat. Whether I’m making chicken or steak tacos, I like to start with the same marinade – a cilantro and lime vinaigrette with a hint of spice and lots of citrus. After a few hours in the acidic and flavor punching bath, meat has no choice but to be tender and juicy. A few minutes on a hot grill, and you’ve got a fab foundation for a great taco.

Shredded Chicken

The choice of taco toppings is endless – sliced avocado, salsa, shredded lettuce, cilantro, cheese, corn salsa, guacamole, chipotle sour cream, diced tomatoes, sauteed onions and peppers….in fact, if you’re hosting a casual party, a taco bar is a great buffet idea! Tonight I’m gonna go with fresh mango salsa and sliced avocado (and probably a little cheese and sour cream too…). If you can’t find good fresh mango, frozen works alright too. It’s not quite as good – but it’s better than no mango salsa.

Mangoes Mango Salsa

Cilantro & Garlic Tacos

  • 1 1/2 Lb. boneless skinless chicken breasts
  • 1 C. cilantro and garlic marinade
  • Flour tortillas
  • Mango salsa
  • Sliced avocado
  • Shredded cheddar
  • Sour cream

Marinate chicken breasts in marinade for at least 6 hours. Remove from marinade and grill on medium for 15 minutes, or until cooked through. Allow meat to rest for 10 minutes, then shred with 2 forks.

Warm tortillas on the grill for about 1 minute per side. Alternately, heat them in the microwave for 30 seconds.

To assemble, place a scoopful of chicken on to warm taco shell. Top with mango salsa, 2 slices of avocado, a Tablespoon of cheese, and a small spoonful of sour cream.

Cilantro & Garlic Marinade

  • 1/2 onion, roughly chopped
  • 4 garlic cloves, smashed
  • 1 jalapeno, halved
  • Lime zest and juice, from 1 lime
  • Handful fresh cilantro
  • 1/3 C. orange juice
  • 1/3 C. olive oil
  • 1/2 tsp. salt
  • 1/2 tsp. pepper
  • 1 tsp. cumin

Combine all ingredients in a blender. Blend until everything is smooth and combined. Marinate chicken for at least 6 hours, preferably overnight. Makes enough marinade for 6 chicken breasts.

Mango Salsa

  • 1 mango, diced
  • 1/4 C. red onion, finely diced
  • 1/2 jalapeno, seeded and finely diced
  • Handful cilantro, chopped
  • Juice of one lime
  • 1 T. olive oil
  • Pinch of salt, pepper, and cumin

Combine all ingredients. Cover and refrigerate until needed.

White Cheddar Macaroni & Cheese

White Cheddar Mac n Cheese2

We eat alot of macaroni and cheese around here – Kraft from the box, made from scratch, out at a restaurant….when you have a 3 year old, mac and cheese is a regular. I make a few different versions of homemade macaroni and cheese, but this one is a household favorite (I think it’s the garlic breadcrumb topping….)

mac n cheese ingredients

  • 1/2 Lb. small pasta (macaroni, shells, rigatoni, etc)
  • 1/4 C. sour cream
  • 1/4 C. milk
  • 3 T. butter
  • 4 oz. extra sharp white cheddar, grated
  • 4 oz. pepper jack, grated
  • 2 oz. parmesan, grated
  • 1/4 tsp. salt
  • 1/2 tsp. pepper
  • 1 tsp. mustard powder
  • 1 tsp. Italian seasoning
  • 1/2 – 1 C. garlic bread crumbs

Cook pasta to package directions. Drain and pour back into the pan. Add in butter, stir until melted. Stir in sour cream until all pasta is coated. Add in cheese and seasonings. Stir until coated. Pour into greased baking dish. Top with bread crumbs and bake at 350 for 30 minutes (or until top is brown and dish is bubbly).

Garlic Bread Crumbs

In a food processor, pulse leftover garlic bread until fine. Alternatively – use day old, toasted bread, 1 clove garlic, salt and pepper, and 1 tsp. olive oil. Pulse until fine crumbs.

garlic bread garlic bread bread crumbs