Sunday Chili

chili

Every year I look forward to the start of football season and the first signs of cooler weather (Savannah summers are no joke). Football and Fall invoke a craving in my belly that just doesn’t exist when it’s hot and sticky out – and that craving is for Chili! Well now we’ve come to the end of the season (at least for my team, who has no chance at going to the play offs) and it’s even colder out – high in the low 50’s (that’s cold for me!) and that Chili craving is stirring! So let’s get to it…

The complete recipe, with measurements can be found at the bottom of the post

Put the ground beef away – this is a serious chili recipe. And serious chili requires steak. Bottom round, chuck roast, sirloin – any cut with a little marbling and connective tissue. I usually go with what’s on sale. Today it’s boneless chuck steak.

chuck steak

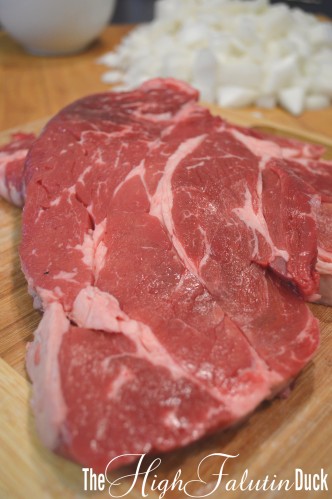
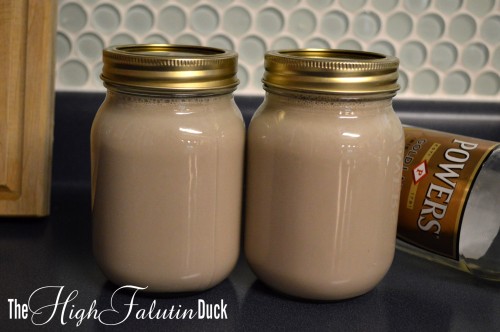
Put the meat in the freezer for about 20 minutes, and get the rest of your ingredients prepped. If you bought already cubed “stew meat” then skip this step. And hang your head in shame for buying the mysyery mix of off-cuts that was cubed at some nondescript time in history. Moving on…while you’re at the fridge, grab two dark beers (I use Guinness). One of these can be opened and drank. The other needs to sit out and warm up (it will be used to deglaze the pot).

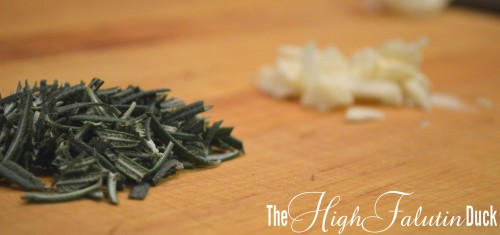
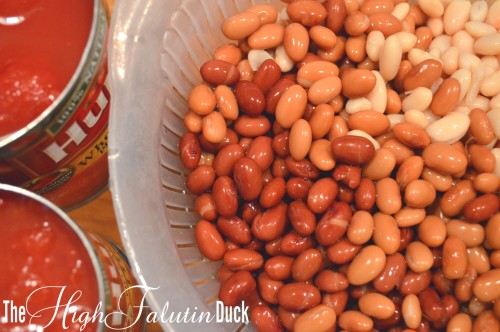
Dice up your bacon and rough chop the onions and garlic. Get your beans opened, drained and rinsed. I am using small red, Great Northern, and pinto. Feel free to use your favorite bean or combination. Open your tomatoes too, but keep them (and their juices) in the can until they are ready for the pot.

beans and tomatoes

ingredients prepped

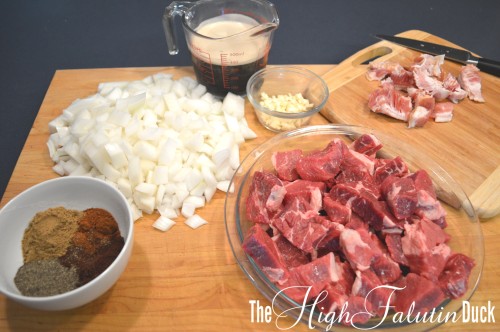
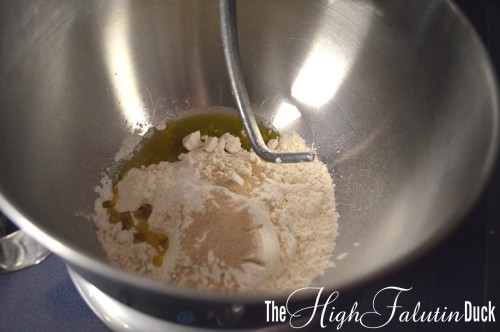
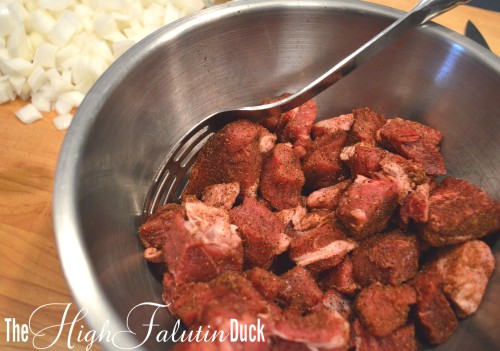
Without proper seasoning, chili is just meat and tomato sauce. So in a small bowl, mix together chili powders, cumin, black pepper and salt. Now that our meat has spent some time in the freezer, it should be easy to cut into cubes – no bigger than 2 inches. Toss the meat in 2 Tablespoons of the spice mixture, and shake off any excess.

seasoned steak

I like to use a Dutch oven – but any heavy bottom pan will work. Heat your pan on medium-high and get your bacon cooking. When it’s crispy and brown, move it to a plate with a slotted spoon. Pour off and reserve some of the fat – you only want a light coating in the pot. You may need more later, so don’t go throwing it away. Lower the heat some, and brown your meat in batches. Don’t overcrowd the pot – we want brown not boiled.

browning

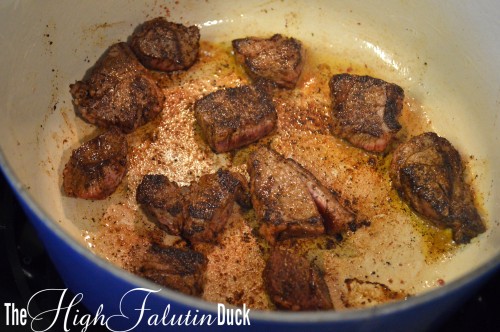
Transfer to a bowl and continue until all the steak is nice and browned. Add a little bacon fat as needed. Try not to rush this process – just like with pot roast, a good browning is key for flavor and texture. When your meat is done browning, your pan should look like this:

not burnt

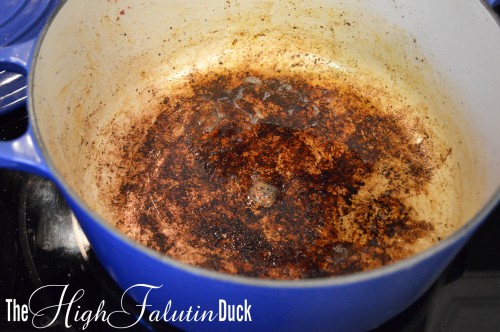
No, it’s not burnt – that is flavor! Once the onions start to sweat, this yumminess will start to scrape up and infuse into the dish. And the beer will take care of getting the rest up.

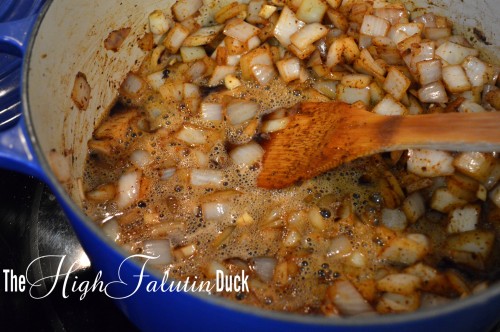
Now turn the pan up to medium high and start your onions. You want them softened, with a little color. This should take about 5 to 10 minutes. When they are starting to brown, add the garlic and a 1 Tablespoon of the spice mix. Add about a teaspoon of salt too. Stir and cook for 2 – 3 minutes. Now is time for the beer. If you forgot and drank both beers from earlier, go ahead and pull out two more (clearly this recipe is making you thirsty…). Pour one beer into the pot, and use your wooden spoon to scrape up any tasty bits from the bottom. Allow the beer to simmer for a few minutes before you continue.

deglaze

Return the bacon and steak (with any juices that may have lurched out) to the pot. Also add in your tomatoes, beans, 5 Tablespoons of spice mixture and a teaspoon of salt. You will need to add 2 to 2 1/2 cups of water – just to cover all of the ingredients. I fill up my tomato can, no sense in throwing away that tomato residue. Give it a good stir and bring it up to a slow boil. Once bubbles start moving to the top, drop the heat to a simmer and put a lid on it.

not beef stew
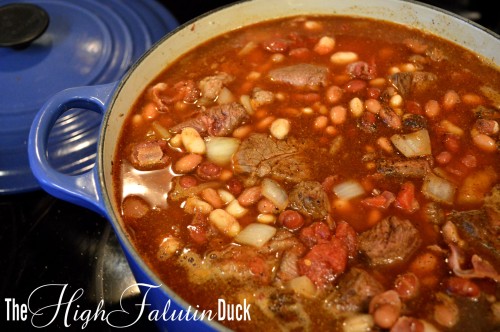
Yes, it looks like beef stew at this point, but don’t worry. After 4 hours of simmering, everything in the pot will break down and melt in your mouth. Now go watch the game and finish that beer. Oh, you already finished it? Well get another, but take it easy….we don’t want to forget about that pot of spicy goodness on the stove….

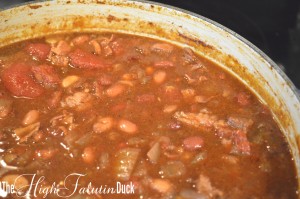
Check your pot every half hour or so, and stir the chili. After an hour to an hour and a half, remove the lid and raise the heat a little. We want to let the liquid reduce slowly. The total simmering time should be 4 to 5 hours. If the liquid is evaporating too quickly, put the lid on and reduce the heat. If it’s too slow, take the lid off. Just keep stirring and checking….but make sure you maintain a slow simmer and do NOT boil. Don’t forget to do a taste test every now and then too. You should have some leftover spice mixture, and you could always use a dash (or a Tablespoon…) of Tabasco sauce – taste and season as needed.

About 3 hours into the simmering, take a few minutes to inspect your meat. At this point, it has cooked long enough (and slow enough) to break down the connective tissues – but it may need a little help breaking apart. Use your wooden spoon to gently separate the meat – pressing it into the side of the pot is ideal. You shouldn’t need a lid for the last hour of cooking. But keep an eye on the pot, and stir regularly. Below is what the chili should look like at the halfway point.

half-way

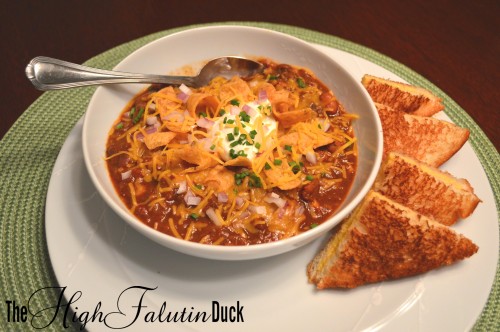
Seeing as our chili is almost done (thank God, I am drooling on my keyboard) we should probably talk about toppings and accompaniments. The options for chili toppings is vast. Personally, I like shredded cheddar, sour cream, chives, diced onion, and a handful of Fritos. The Man (not a sour cream lover) likes cheddar, and Fritos only. “That’s all it needs” he says. He knows how to flatter the cook ;) As far as accompaniments – I like a cold beer and a grilled cheese sandwich.

About the grilled cheese….forget everything I told you yesterday about grilled cheese sandwiches. This IS you kid’s grilled cheese – white bread, butter, and American cheese, browned and melty to elementary school perfection. And it’s the ideal vessel in which to transport chili juices from your bowl to your mouth – we don’t want complex flavors to interfere with it’s sole purpose.

chili

  • 2 pounds steak, cubed
  • 6 ounces bacon, diced
  • 2 large onions, chopped
  • 4 cloves garlic, chopped
  • 12 ounces dark beer (Guinness)
  • 3 – 16 ounce cans beans
  • 1 – 28 ounce can whole plum tomatoes
  • 1 – 16 ounce can diced tomatoes
  • 4 Tablespoons chili powder
  • 3 Tablespoons chipotle chili powder
  • 3 Tablespoons cumin
  • 2 Tablespoons black pepper
  • salt to taste

Combine chili powders, cumin and black pepper in a small bowl. Toss cubed steak in 2 T. of spice mixture. Cook bacon in Dutch oven until crisp. Remove with slotted spoon, and pour off excess fat. Brown steak in small batches, transfer to a plate. Cook onions until soft and browning. Add garlic and 1 T. of spice mixture. Stir and cook for 2 to 3 more minutes. Deglaze the pot with beer. Use a wooden to scrape the bottom of the pot. Raise the heat and let the beer cook for about 2 minutes. Return bacon and steak (with juices) to the pot. Add in beans, tomatoes, 5 T. of spice mixture, 1 t. of salt and enough water to cover (2 – 2 1/2 cups).

Bring to a boil, cover and reduce to a simmer. Stir chili every 30 minutes, removing lid and adjusting temperature as necessary. Taste and add seasonings and/or Tabasco as needed. Simmer for 4 – 5 hours, or until moisture has reduced and meat has shredded. Serve with shredded cheddar cheese, diced red onions, sour cream, chives, Fritos, or oyster crackers.

Jalapeno Poppers

poppers

While impatiently waiting on my chili to cook, I decided we needed an appetizer. Baked jalapeno poppers are a quick spicy fix for the hungry, chili craving belly. Enjoy!

  • 6 jalapeno peppers
  • 4 ounces cream cheese, softened
  • 1/4 teaspoon chili spice
  • 1/8 teaspoon garlic powder
  • 1/8 teaspoon onion powder
  • Salt and pepper to taste
  • Cheddar cheese, shredded

Cut jalapenos in half and scrape out seeds and ribs (leave a little rib tor a spicier popper).

jalapenos

In a small bowl, mix together cream cheese and spices. Spoon cream cheese mixture into each pepper half. Top each pepper with about 1 Tablespoon of cheese.

stuffed pepper

Place peppers in a greased dish and bake at 375F for about 25-30 minutes. Cheese should be starting to brown and filling should start to bubble.

baked

What’s on the Plate This Week? 12/30/2012

Sushi. Definitely sushi! Oh, not that I know how to make it (although I’d love to learn). The Man and I have a New Year’s Eve date at Ele Fine Fusion, which I am real excited for! But with a holiday this week, my usual Sunday meal planning and shopping gets thrown out of whack. So where I will usually use this weekly post to tell you what I will be cooking/posting about in the days to come – I don’t have much to tell you about this week. The only definite on the menu (other than my sushi night out) is Sunday dinner.

The weather is crappy and it’s the last week of regular season football, so there is only one thing i can think to cook – CHILI! A big pot of chili. Chili that starts with cubes of steak and simmers all day until the meat falls apart….where the beans and meat and tomatoes meld into one indistinguishable bite of spicy deliciousness…..served with a grilled cheese sandwich, and a buffet of toppings….a pint of Guinness to wash it down…. Are you hungry yet? I’m starving – better hit the grocery store and get the pot going!

Spicy Chex Mix

spicy chexNothing highfalutin about Chex mix – unless you do something fancy like add cashews. And the only way to make a classic snack better, is to add Tabasco sauce. Feel free to be as liberal (or light-handed) with the Tabasco as you want. If you are a little scared, go light and taste as you mix – you can always add more, even while it cooks. And as far as the measurements and choice of dry ingredients – feel free to change it up to your liking. I’m partial to Corn Chex, so I leave out wheat and rice altogether. I also like to use plain flavored Goldfish crackers – but my mom kills two birds with one stone and uses pretzel goldfish. So mix it up and have fun.

  • 6 Cups Corn chex 
  • 2/3 Cups cashews
  • 2/3 Cups pretzels
  • 1/2 Cup bagel chips (broken into bite size pieces)
  • 1/2 Cup Goldfish crackers
  • 5 Tablespoons butter
  • 1 1/2 Tablespoon Worcestershire sauce
  • 2 Tablespoons Tabasco sauce
  • 1 1/2 teaspoons cajun seasoning
  • 1/2 teaspoon garlic powder
  • 1/2 teaspoon onion powder
  • 1/4 teaspoon black pepper

Melt butter in a small bowl. Add in Worcestershire, Tobasco, cajun seasoning, garlic, onion and pepper. In a large bowl, mix Chex, cashews, pretzels, bagel chips, and goldfish. Pour butter/seasoning mixture over Chex mixture, and stir until well coated. Spread out on a sheet pan, and bake at 250F for 1 hour. Stir every 15 minutes. Once done, spread onto a sheet pan lined with paper towels until cool.

Not Your Kids’ Grilled Cheese

When you think grilled cheese, what comes to mind? White sandwich bread? A little butter? Processed American cheese? Oh good – then your expectations are real low. And do I have a treat for you – I add bacon! Ok, it’s a little better than that…

The complete recipe, with measurements can be found at the bottom of the post

What makes a plain grilled cheese sandwich a good grilled cheese sandwich is shredded cheese and fresh bread. The possibilities of cheesy combos is endless, but the foundation is the same – good bread, good cheese. Tonight we are having avocado, bacon, and tomato on country white bread.

On a whim, I decided to dehydrate the tomatoes. I already had the oven on low (I was making spicy Chex mix to take to a friend’s party) and decided to pop in the sliced tomatoes. I can’t tell you exactly how long they cooked for….about an hour on 300F. Could you skip this step? Of course. You could also peel open a slice of plastic cheese and be halfway done ;)
dehydrated tomatoes

Choose your favorite cheeses to shred. I used equal parts sharp white cheddar and pepper jack, and a handful of fresh parmesan. Colby jack, mozzarella, gouda, Swiss – all would work well here. You will need 2 to 4 ounces per sandwich, depending on how cheesy you want it.

For ease of turning and eating, I like to mash the avocado and spread it on the bread like butter. Add a little lime to keep it fresh, and season with salt and pepper to taste.

avocado

Slice your bread about 3/4 inch thick, and get all your ingredients prepared. I slather a generous amount of avocado on each slice, followed by the tomatoes, bacon, and finally the mound of cheese. Remember that this will melt down – so don’t be shy. If you are reading this post in advance, it’s best to wrap assembled sandwiches in plastic, and keep them in the fridge for an hour (or more). This will help the ingredients mingle and hold together during the cooking process. If you don’t have extra time, add more cheese….because you are likely to lose some to the frying pan.

assembly

Preheat a nonstick skillet on medium, and spray lightly with cooking spray (or just use the same pan that you cooked the bacon in, like I did. Drained of most of the fat, of course). Coat one side of the sandwich (the one closest to the cheese) with a thin layer of softened butter, and put it butter side down into the skillet. Check your bread often, you want it golden and crisp. Coat the top side with butter, so that it’s ready for flipping.

grilling

Once your bottom bread is to the desired color, flip your sandwich over. Now just wait patiently….but if the sandwich seems to be cooking too quickly (bread is browning, cheese isn’t melting) lower the heat and put a loose fitting lid over the sandwich for a few minutes.

grilled cheese

  • 4 slices bread, cut 3/4 inch thick
  • 4 – 8 ounces cheese, grated
  • 4 slices thick cut bacon, cooked
  • One avocado, mashed
  • Juice of half a lime
  • Freshest tomato, sliced and dehydrated (optional)
  • Salt and pepper
  • Butter

Spread mashed avocado onto each slice of bread. Layer tomato, bacon, and cheese onto one slice of bread per sandwich. Top with second slice of bread. Coat top slice of bread (closest to cheese) with thin layer of butter. Grill in a preheated non-stick pan until golden. Butter second slice of bread and flip. Remove from heat once both sides are golden and cheese is melted through.

Homemade Bailey’s

Perusing through Facebook one morning, I came across a friend’s picture of the Bailey’s cocktail he had enjoyed the night before. Yum! I thought, I love Bailey’s! In fact, my husband had recently spent $45+ on a bottle of that fattening deliciousness. Then I noticed the caption on the photo – HOMEMADE Bailey’s. Say whaaaaat!? I never imagined that this was something you could make at home, and for a fraction of the cost. I immediately got the recipe from his wife and gave it a whirl (literally – you will need a blender). No more store bought Bailey’s for us!

I modified the recipe slightly. The original called for heavy whipping cream, more almond extract, and less whiskey. The heavy cream is good – it produces a frothier drink. It is VERY good – but a little too filling for my cocktail tastes. I found the almond extract to be a little over powering – so it was reduced by half. And as for adding more liquor, well….

This goes great in coffee, or over a little ice. Or as my friend and his wife were having it – over coffee ice cubes! Enjoy.

bailey's_ingredients

  • 1 Cup half & half
  • 14 ounces (one can) sweetened condensed milk
  • 2 Tablespoons chocolate syrup
  • 3/4 teaspoon instant coffee grounds
  • 1 teaspoon vanilla
  • 1/2 teaspoon almond extract
  • 1 1/2 Cups Irish whiskey (I used Powers)

Chill whiskey and condensed milk. Add all ingredients in a blender. Turn on high for 1-2 minutes, or until well combined. Store in an air tight container (I use a mason jar). Keep refrigerated for up to a month. Makes 4 cups.

bailey'sA 750ml bottle of Irish whiskey makes 2 batches (8 cups total). It looks like I’m going to have to get another bottle…


Rosemary Focaccia Bread

Rosemary, garlic, and bread. And a ton of olive oil….how can you go wrong with that? Focaccia is the simplest bread to make – it’s essentially pizza dough, with extra oil and seasonings. It is good plain, but even better with a generous Tablespoon of rough chopped rosemary and thinly sliced garlic.

garlic and rosemaryAlthough I sometimes like to be a hero and mix my bread dough by hand, I typically let the KitchenAid mixer do the heavy work. There is nothing meditative or relaxing about kneading dough while contending with a very busy 3 year old. So the next step is to get out your stand mixer (or bowl and wooden spoon, if you don’t have a toddler) and add in your flour, yeast, salt and oil.

dry ingredients

With the dough hook, mix the ingredients for a minute or two, then add in the water. Turn the mixer up to medium low, and find something else productive to do for 5 to 7 minutes.

mixing

Expect this dough to be sticky – that’s ok. Your dough isn’t really sticky? That’s ok too! There is an inconsistency when using volume (instead of weight) to measure flour. In most cases, this causes problems (this is why recipes call for inexact cups of flour, instead of an exact amount). But no worries here – as long as the dough is not overly dry (think crumbles), the finished result will be good. 
press
Oil a 9 inch baking pan with about 1 Tablespoon of olive oil. Dump the sticky dough into the pan, and then use wet fingers to press the dough into a disk. Water or oil on your fingertips works well for this. Tightly cover with Stretch-Tite (because it’s the only brand of plastic wrap that actually works…) and allow to rise for about an hour. 
pokeWhen the dough has risen, take off the plastic wrap and give it a good poke. About a dozen or so, with your finger or the handle of a wooden spoon. At this point, you should go ahead and preheat your oven to 425F. You should also douse your bread in olive oil….or drizzle….whatever fat level you prefer. I use about a Tablespoon – but a little more, is good too. You can also sprinkle the bread with salt, pepper, dried Italian seasoning, parmesan cheese, etc. 
oiledWhen the oven is ready, give the pan a good swirl – to dislodge some of the oil from the holes. Then bake until golden brown, and everyone in the house is drooling. Let it cool on a wire rack for at least 20 minutes before you cut and serve.
finished loaf
  • 2 Cups flour (unbleached all-purpose)
  • 1 Cup warm water
  • 1 teaspoon active dry yeast
  • 1/4 teaspoon salt
  • 1 Tablespoon oil
  • 1 Tablespoon rosemary
  • 1 Tablespoon chopped garlic
  • olive oil, salt, pepper, Italian seasonings to top
Combine flour, yeast, salt and oil in the bowl of a stand mixer. Add water and mix/knead until combined. Add garlic and rosemary. Mix for 5-7 minutes, until dough is well-kneaded. The dough will be sticky.
Pour 1 Tablespoon of oil into a 9 inch cake pan. Dump dough into pan, and press out into a disc. Cover with plastic wrap, and allow to rise for 1 hour.
10 minutes before baking, use you finger to make indentations into the dough. Drizzle with 1-2 Tablespoons of olive oil. Sprinkle with sea salt, cracked pepper and/or dried Italian seasoning.
Bake at 425F for 20-25 minutes, until golden brown.

Country White Bread

CWB

A conversation with a friend about feeding our kids less processed food, left me looking for a go-to white bread recipe. I love to bake bread, but it is typically a Sunday Dinner (takes all day) affair. I needed to find something that was quick (as quick as yeast breads get), easy, and something I could do on a week day morning – but still flavorful enough to rival a starter bread with multiple rises, water baths, and misting!

I found this recipe at Pennies & Pancakes (a great resource for saving money while eating healthier food). The original recipe is for two loaves. But since I only have one loaf pan, I modified the recipe for one. Big mistake….because this stuff disappeared fast! (Note to self – buy another loaf pan). Enjoy!

  • 1 1/2 Cups warm water
  • 1/8 Cup sugar
  • 1 1/2 teaspoon active dry yeast
  • 2 Tablespoons oil (canola)
  • 1 teaspoon salt
  • 3+ Cups flour (unbleached, all-purpose)

Combine water, sugar and yeast in the bowl of a stand mixer. Let stand for 5 minutes to proof. Add oil, salt and 3 Cups of  flour. Mix/knead on low until dough is elastic and slightly sticky (7-10 minutes). If dough appears to be too sticky/wet, add flour (1/4 Cup at a time) until right consistency is reached.

Place dough in a lightly oiled bowl. Cover with plastic wrap, and allow to rise to double in size (about 1 1/2 hours). Punch down dough, and knead onto a lightly floured surface. Form into a loaf, and place into a greased 9″ loaf pan. Allow to rise until dough is 1-2 inches above the pan edge.

Bake bread at 375F for 25-30 minutes. Immediately remove from pan, and allow to cool on a rack.

This bread is great fresh, toasted with butter, or to make a fabulous grilled cheese sandwich!